I got a new projector a couple of days ago and I needed to get it mounted. My original idea was to put up a shelf and just set the projector on that, but I didn't want to sacrifice wall space. I looked at some adjustable ceiling mounts on Amazon, but most of them looked really cheap or were way to expensive (no middle ground). I had a cheap one for my last projector and I found myself needing to re-aim and re-focus the projector almost every time I used it. So I decided I could do better.

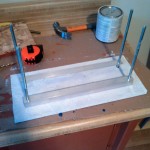
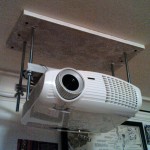
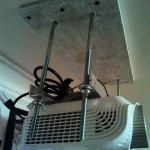
Unfortunately, I didn't think to take step by step pictures, but the concept is pretty simple. I screwed a piece of plywood to my ceiling and hung aluminum angle from it by 4 carriage bolts. The angle was then attached to the projector using the nuts that are inset in the projector for use with mounting brackets. The 4 wing nuts allow me to raise and lower each corner so I can tilt it in 4 directions. It does not allow for rotation, but I really have no need to rotate my projector and that was what kept getting bumped out of alignment on my previous ceiling mount.
Parts List
- 4 – 3/8″ x 10″ Carriage bolts – $6.60
- 4 – 3/8″ wing nuts – $2.36
- 4 – 3/8″ washers – $1.18
- 1 – piece of 1/2″ plywood scrap – $0.50
- 3 – M3 x 10mm Machine screws – $0.48
- 3 – M3 locking washers – $0.43
- 1 – 36″ x 1″ x 1/16″ Aluminum angle – $5.37
Total: $16.92
Process
Dimensions could vary depending on the size of your projector and other factors.
- Cut a piece of plywood to 17″ x 5″
- Cut two pieces of 15″ aluminum angle
Make sure this is wider than your projector by at least 2″. - Drill 4 holes wide enough apart that your projector will fit between them
My projector is ~13″ wide so I left a 14″ gap between mine. These holes are what the carriage bolts pass through so they should be big enough for that. - Drill holes in the aluminum angles near the edges the same distance apart as the holes in the plywood above. Same size holes as above.
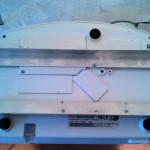
- Drill holes in the angle that line up with the inset mounting nuts on the projector. Be very careful about this part it's easy to mess up as there is not much wiggle room.
- Attach the angle to the projector.
- Test fit everything.
- Now is a good time to paint the plywood to match your ceiling if you'd like.
- Screw the plywood in to your ceiling. DO NOT do this with the projector attached projectors hate dust.
- Slide the angle / projector on the carriage bolts and put the 4 washers and 4 wing nuts on.
- Tighten as much as you need.
Final Notes
You may want to double up on the wing nuts (one on top and below each angle) to ensure the angle stays squeezed between the wing nuts. When I was adjusting mine I had some problems with the corners not staying down as the projector isn't all that heavy. I just kept pushing down on it as I adjusted it and it seems fine.
You should probably wrap your projector in plastic or leave it in it's box while you do all of this (or do it in a different room). Projectors are pretty sensitive to dust and you wouldn't want to break your new toy before you even get it on the ceiling.
All dimensions are probably different depending on what projector you have.
The M3 bolts for mounting the projector to the angles are fairly standard and should work with most projectors, but you should probably check yours first. I just googled the name of my projector and found someone who had posted the correct size for my projector on a forum. If all else fails just bring your projector to the hardware store and test different sizes until you find the right ones.
Pictures